 If you want to add a little more oomph to your sound, it’s common to use an overdrive or distortion pedal. The two affects have similarities, but there is a difference between overdrive and distortion.
But if you’re using a distortion or overdrive pedal, do you know and understand what the different knobs do? Are you able to adjust everything so that you get the tone you want? Let’s explore how overdrive/distortion works so that you can better dial in the sound you’re after.
How Do Overdrive And Distortion Pedals Work?
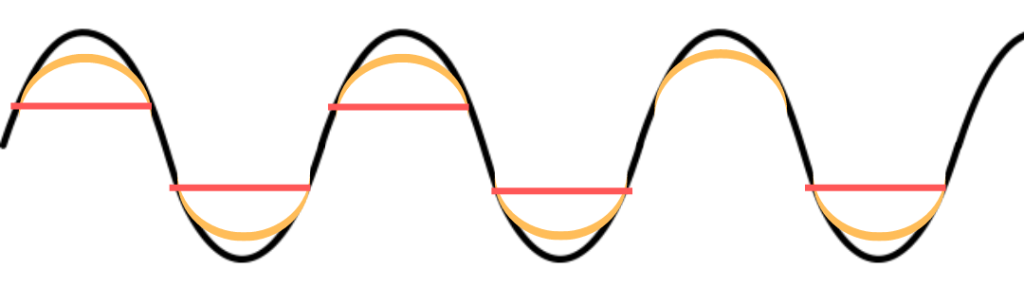
Basically speaking, both overdrive and distortion clip the electrical signal sent out by the guitar to give it a distorted sound. In the diagram below, the electrical signal and sound wave can be thought of as a regular wave form. Overdrive (in yellow) softly clips the signal to give a little bit of roughness. Overdrive (in red), has hard clipping and squares off the wave.
This effect is done through the manipulation of the electrical signal of the guitar using an operational amplifier (op-amp for short). Wampler has a great article on the basic design of an overdrive pedal (the principle is basically the same for distortion) if you want some more depth, but, for the purposes of this article, I’m mainly focusing on the op-amp and the potentiometer set up shown below.
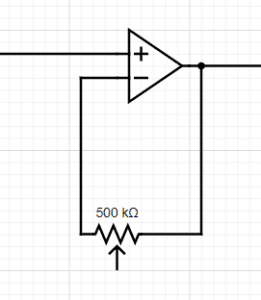
The diagram may look confusing, but basically speaking, the op-amp (the triangle in the diagram), takes an electrical signal, sends it out again through a resistor (the squiggly line), which lowers the voltage, this difference is then added to the signal.
When the resistor is a potentiometer (which is all the knobs on guitar pedals are), you’re able to change the resistance. More resistance and the signal is boosted more!
So, in order to understand how to use a distortion or overdrive pedal, you need to understand what’s happening inside the pedal, at least basically. Turn the knob, and the electrical signal is increased through the op-amp. Turning the knob increases the voltage difference across the op-amp, increasing the signal.
There’s a little more to it than that, of course. The diagram above would only create a volume boost, if you want overdrive/distortion you need to wire in a couple diodes as well. When a diode’s threshold is overcome, it will then clip the signal, creating a distorted sound.
So, for your typical distortion/overdrive pedal, you have the gain/drive/distortion (it’s all the same thing), which is controlled through the op-amp interacting with the drive potentiometer and a couple diodes. You also have a tone knob (also a potentiometer) which just regulates what frequencies come through to emphasise bass or treble. And finally you have the volume (sometimes just called level) knob (potentiometer again!) which adjusts the final signals strength and therefore the volume.

Too technical? Maybe… but the big takeaway is that each knob is adjusting the strength of the electrical signal, and the drive knob is actually boosting that electrical signal through the op-amp.
What The Knobs On Distortion And Overdrive Pedals Do
I’ve already touched on this, but with a better understanding of the electrical parts of a distortion or overdrive pedal, hopefully you have a better understanding of what’s happening in the pedal.
Let’s take a look at each dial.
What The Drive/Gain/Distortion Dial Does On Distortion And Overdrive Pedals
As mentioned, for the purposes of this article, drive, gain, and distortion are all the same thing. Electrically, basically the same thing is happening.
As mentioned, the electrical signal passes through the op-amp, comes out, goes through a potentiometer, then back into the op-amp again. The potentiometer (which is just your gain knob) adjusts the electrical resistance and therefore how much the electrical signal is boosted. From there, the signal passes through pairs of diodes where it’s clipped.
The higher the signal is boosted, the more that’s clipped from the diodes.
Boosting the gain will increase the volume quite a bit because you’re boosting the electrical signal, but you’ll also find that more of that signal is getting clipped and you’re getting a more distorted sound.
What The Tone Dial Does On Distortion And Overdrive Pedals
The tone knob adjusts the tone, obviously! This means the dial allows through more bass or treble, depending on how it’s adjusted. The rest of the signal is lost.
So if you want a more twangy treble sound, turn that tone up! If you want it with more bass, adjust it accordingly.
What The Volume Dial Does On Distortion And Overdrive Pedals
The volume knob simply adjusts the final volume of the signal.
By now the electrical signal has been adjusted for for gain/distortion and tone. The final volume knob works by adding resistance to this final signal; less resistance and more of the signal gets through so it’s loud; more resistance and less signal gets through so it’s quieter. Pretty simple.
How To Adjust The Dials On Distortion And Overdrive Pedals For Good Tone
So we’re finally here…
While I’m sure many people have skipped to this part, hopefully many others have found the technical aspects of distortion and overdrive operation interesting and can use this information to better adjust their pedals.
When finding the tone you’re after, first adjust things without any drive or distortion. This will only muddle your sound and push the volume too much while this setting really should be used to distort the sound rather than add volume.
Get your volume knob to a good point where you’re happy with how loud it is, then go and adjust your tone until the right frequencies are coming through. Once you’re happy with that, now it’s time to start adding some grit via the gain/drive/distortion knob. Of course this will add volume, so adjust your volume knob accordingly.
Resist the temptation to just dial everything up to 11, especially the gain/distortion. Sure, if that’s the sound you’re after, go for it, but you’ll likely find some great sounds with everything a little bit more sensible.
Have Fun And Play With It
Ultimately you’re going to have to find your own sound, so have fun and play with it. You can’t dial in anything “wrong,” you may just dial in settings that aren’t as good as others for the type of music you want to play.
Related posts:
 What’s The Difference Between Distortion And Overdrive?
 What Is Reverb And How Does It Work?
 What Is Wah And How Does It Work?
 What To Look For In A Beginner Guitar
 What Guitar And Gear Did Stevie Ray Vaughan Play?
 What Are The Different Sizes Of Acoustic Guitar?
 What’s The Difference Between A Tube And Solid State Amp?
 What Guitar And Gear Does Eric Clapton Play?
 What Are The Different Kinds Of Electric Guitar
 What Is A Baritone Guitar?